Preliminary notes
This use case can be reproduced with both Talend Open Studio and Talend Integration Suite.
As the first use case to be read by a beginner, the job creation here is very detailled. However, it is strongly advised to read Talend's documentation first.
Other use cases are less detailled.
Rationale
Execute a Talend job which has no specific interaction with Petals.
The job is exposed as a service into Petals. When this service is called, the job is executed.
The message provides no parameter to the job, and only the job's result is returned.
Creating and exporting the job
The job to be executed performs the following actions:
- The job connects to a database.
- It retrieves the content of a table.
- It serializes part of the extracted data as a CSV file on the disk.
This job has one context variable, which indicates the location of the CSV file.
| In the scope of this use case, it is assumed there is a database formationtalend on the localhost, having a table named customers. The schema of the customers table includes two columns named CustomerName and CustomerAddress, both being of type varchar(255). |
Creating the job
Create a new job called SimpleJob (right-click on Job Designs and Create Job).
Add a tMysqlInput component on the graphical workspace. It will be the start component.
Then, add a tFileOutputDelimited component on the graphical workspace, and link the two components with a main connection.
Your job should look like this:

Let's configure the components.
Select the tMySqlInput component, and go into the Component view.
Provide the required information to connect to the database.
Set the query value to
"select CustomerName, CustomerAddress from customers"
Make sure to not forget the surrounding quotes.

Click Guess schema.
The request is parsed, the database is queried about its structure, and the component schema is guessed.
If you click Edit schema, you can see the component schema, with the column names and types.

Propagate the schema changes to the tFileOutputDelimited.
And let's now configure this second component. Select it on the graphical workspace and go into the Component view.
Click ... on the file name row, and select the output location, e.g. "C:/Documents and Settings/vzurczak/Bureau/output.csv"
We are now going to replace this value by a context.
Go into the Contexts view.
Click + and give the new context variable the name "outputLocation". Let it be a string.
Go into the "values as tree" tab, and set the default value of this context variable to C:/Documents and Settings/vzurczak/Bureau/output.csv (without the quotes).

Now, turn back in the Component view and select the tFileOutputDelimited component.
Set the file name value to
context.outputLocation
and save the job.
When this job is executed, it reads the values in the MySQL table, and writes them into the CSV file whose location is defined by the context variable outputLocation.
Exporting the job
Select the job and right-click it. Select Export to Petals ESB.
Update the target destination.
Let the job be exposed as a singleton. Do not export any context.
You should have the following dialog:
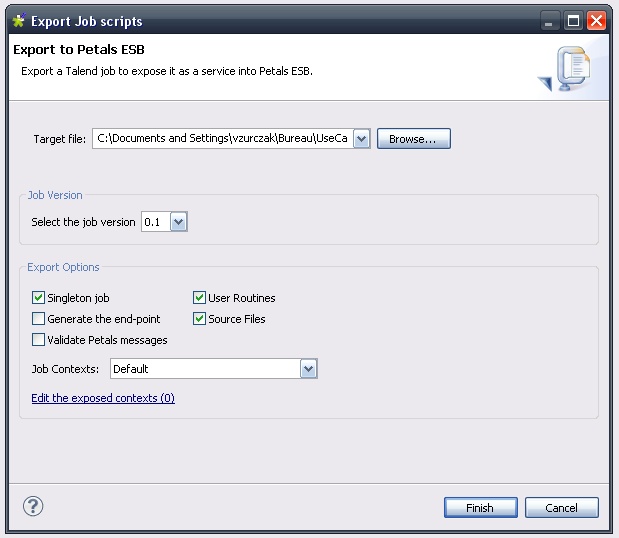
Click Finish.
Deploying and testing in Petals
Looking at the generated WSDL
In the created Petals service assembly, the most interesting thing to look at is the WSDL.
Indeed, the WSDL will determine the way the exported service will be called.
The input message's description requires empty parameters.
<xs:element name="executeJob" type="tns:executeJob" />
<xs:complexType name="executeJob">
	<xs:sequence>
		<xs:element minOccurs="0" name="contexts" type="tns:talendContexts" />
		<xs:element minOccurs="0" name="in-attachments" type="tns:inAttachments" />
		<xs:element maxOccurs="unbounded" minOccurs="0" name="in-data-bean" type="tns:inRow" />
		<xs:element maxOccurs="unbounded" minOccurs="0" name="talend-option" type="xs:string" />
	</xs:sequence>
</xs:complexType>

<xs:complexType name="talendContexts">
	<xs:sequence>
	</xs:sequence>
</xs:complexType>

<xs:complexType name="inAttachments">
	<xs:sequence>
	</xs:sequence>
</xs:complexType>

<xs:complexType name="inRow">
	<xs:sequence>
	</xs:sequence>
</xs:complexType>
And the output message only includes the job's result.
<xs:element name="executeJobResponse" type="tns:executeJobResponse" />
<xs:complexType name="executeJobResponse">
	<xs:sequence>
		<xs:element minOccurs="0" name="talend-job-output" type="tns:talendJobOutput" />
	</xs:sequence>
</xs:complexType>

<xs:complexType name="talendJobOutput">
	<xs:sequence>
		<xs:element maxOccurs="unbounded" minOccurs="0" name="executionResult" nillable="true" type="ns1:stringArray" />
		<xs:element minOccurs="0" name="outAttachment" type="tns:outAttachments" />
		<xs:element maxOccurs="unbounded" minOccurs="0" name="outDataBean" nillable="true" type="tns:outRow" />
	</xs:sequence>
</xs:complexType>

<xs:complexType name="outAttachments">
	<xs:sequence>
	</xs:sequence>
</xs:complexType>

<xs:complexType name="outRow">
	<xs:sequence>
	</xs:sequence>
</xs:complexType>
Deploying and testing this new service
To test this service, you can use a tool like SoapUI.
This way, you can see what the XML messages look like.
The first thing to do is to create a service-unit for the Petals-BC-SOAP component, that exposes (consumes) our Talend job as a service outside the bus.
This step is not described here. You can take a look at the Petals-BC-SOAP documentation and the Petals Studio documentation.
Just make sure the SOAP configuration uses the InOut MEP.
Now, your input message should be:
And the returned message should be: